April 2021:
Louise passed suddenly (no-one was expecting it) and we all miss her.
We have kept this blog up to show what a wonderful and creative thinker and doer she was.
David, Louise’s husband of 32 years.

The Calembeena Entities
April 2021:
Louise passed suddenly (no-one was expecting it) and we all miss her.
We have kept this blog up to show what a wonderful and creative thinker and doer she was.
David, Louise’s husband of 32 years.
So, it’s a public holiday today and I have some extra time to play.
I have done some colouring in


I think any arrangement of coloured pieces that doesn’t tie in with the shapes of the wire would just make things too busy. But even then I’m not sure if the different colours detract from the wire work.
So I tried out a few examples.


They do look cool and interesting, but then I tried them with plain colours:


and I have to say that I think the single colour does best justice to the wire work, and the darker colour better than the light.

I really liked the green but I don’t think it’s the colour that best reflects the idea of the waters of the lagoon. I’ll keep thinking about the colour, but I think I have decided to go with plain for this project. I have another idea for the vetrifusion, so it will come up again.
Today, an exciting development with a visit to Blue Dog Glass in Mordialloc.
I have ordered a kiln – so excited! – and I have bought some glass to begin thinking about and preparing the glass part of the windows.
 Apart from knowing that I want to use blues and greens and greys maybe with some yellow and pink, I am not sure how I want to do it and it may take some experimenting.
I have cut nine squares of clear glass to use as backing.

Then just a little playing with some shapes and colours to see where it leads my thinking.


I think I will spend some time with some coloured pencils and photocopies of the design. Watch this space.
Last but not least another tricky one with lots of pieces, so more tests in copper.


As well as the trickiness of sixteen small pieces of wire, there are sixteen spikes to add. After testing options of cutting them from sheet, I decided to once again go with the metal clay.
The sixteen part circles were a real bugger to get lined up and soldered and the first attempt ended up with them being slightly too big for the space. I had to pull them all apart again and tighten the circles and then re-solder. Finally I have them all fitting.

The spikes were tricky too and being so small, were easy to melt rather than just sinter the metal clay. I made a few extras, but not enough, as I also melted or broke a couple in the process of soldering them to the wire.
Once together, this was another one needing a little binding to finish off. this time with 0.5mm wire.
 Two out of four complete.
So here is where the difficulties really start.
Number 8 is definitely the most complex shape with the most components.
Again I started with some copper test pieces to check lengths and curves.


The small diamonds I had made with metal clay last week when I made the triangles for Window 2, but they now look a little too big to fit two of them in the space – maybe only one will be fine.
I cut all the pieces and started the bending with some first bends on the jig so that the basic sizes and angles are consistent.

Then the detailed bends and lay it out to see how it fits.

All looks good. Of course much much easier said than done. Lining everything up was hard and the second swirls were especially tricky because smaller pieces of wire are easy to overheat and melt. I ended up having to re-do these completely after melting two. I also had to pull apart and re-solder the bottom halves.
Once all together, it looks really good. I ended up with only one of the diamonds at top and bottom and added one in the middle which helped cover the complex join of multiple pieces which looked a little messy.

Yes, one of the diamonds is missing at the top, but I did add it.
Two more that went extremely quickly and easily with the help of the jig.


With both of them I made slight changes from the original design.
I think the one on the left is one of my favourites.
This is where the wire jig really came into its own.


Getting the consistent curves in this component were a breeze with the jig but would have been a total pain without it.
(Note: I’m not actually trying to get them absolutely perfectly identical. I think if you want that sort of perfection, then get a machine-made piece. The small, organic variations in the curves, just tell me it is one of a kind. Of course, the difference between small organic variation and sloppy work is in the eye of the beholder and potentially a slippery slope)
Next was to make the other components. Laying them all out together, it seems that they are a bit too big, but looking good.

A little bit of re-jigging (if you will excuse the pun) and things are basically ready to put together. I have soldered the middle section, but stopped for the evening (after more than 9 hours in the studio) so that I don’t completely stuff it up, being this close.

Another day, another window.
In addition to the silver tubing, Friday’s mail brought the wire jig. For the uninitiated, a wire jig is basically a base with lots of holes in it and a set of removeable posts (of various thicknesses) around which you can bend wire. I knew that with a lot of the stuff coming up, having a way to replicate the same curves multiple times would be invaluable.
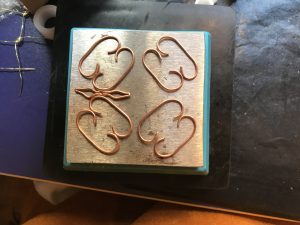
So, for window four, I decided to try things out in copper (which is the cheapest of the pure metals I have access to). I had revised the design of this one from nine little parts, to four (compare the design pic in the first post to that below) mostly because it seemed too busy compared with the other windows but I also realised with the weight/thickness of the wire I was using, it was going to be both very hard to make and look too filled in.
So, first attempts with copper seemed quite good.


I also needed to work out if the whole thing would fit together and fill the frame, so I made most of the parts in the copper to test if I had the curvy bits the right size before I cut them in silver.
All looked good, so I cut and prepared the silver components.

Soldering was fiddly to line up the inner portion, but went according to plan.

After adding the outer curves, the last touch on this one was to bind the major joints with 0.3mm wire.

Really quite happy with this one.
So a little searching online and some thinking and I came up with the idea to frame the windows with square silver tubing 0.4mm wide. I wanted a little depth, but anything much wider would, I think, be too heavy.
The guys at A&E metals (www.aemetal.com.au) have an incredibly fast turnaround and from thinking about it on Wednesday and ordering online Wednesday night, they had rung me on Thursday with a question about the lengths I wanted it in and it arrived in the mail on Friday!
So putting the frames together was not as simple as it should have been (are you feeling the theme here?). After several attempts, I think the major problem is the small torch I have been working with (butane), which has been fine for the small silver metal clay and soldering applications I have used it for. However, with the larger pieces of metal that are a bigger heat sink, I just can’t get the temperature hot enough with this torch to melt the solder.

I knew I would need a bigger torch for the glass work, but it looks like I will need it for this also.
So the next window is something quite different. I wanted to wait until I had the wire jig for the more complicated shapes, so I tackled the middle one in the meantime.

What the not-very-good-drawing doesn’t actually show is that where the strands cross, they are knots. Obviously not something one could easily do with a thick wire, so I worked with a 0.5mm wire and started figuring things out with brass wire (cheaper than silver).

Once having figured how the knot was going to work (and that I could get it to be roughly the right size), I had to figure out how to make the net.

The tricky parts were in making the knots all look the same (there is a right and a left) and in positioning them the same distance apart. And then to make it look like the drawing, I needed two nets, offset against each other. Another thing I discovered was that the knots tended to wriggle and slip about a little bit. A solution was that once the knot was in the right place, a couple of taps with the jewellers hammer flattened the wire/knots and they stayed put. All this took quite a bit of working out and trial and error.

Once I had figured it out in the brass, I went on to the silver. The delicate nature of the 0.5mm wire doesn’t leave all that much room for mistakes. As you will see in the bottom right, one of the wires snapped when I had had to undo the knot and re-do it because it was back-to-front compared to the others. At this stage I had been working on it for a number of hours and realised that I was making more and more mistakes, probably because I was tired. I decided to stop for the night.
Lesson: Even if not sleepy-tired, my eyes, hands and brain do get tired and multiple mistakes are a sign that it might be time for a break.
I thought the brass and silver combination looked really pretty (and I may well use it another time) but the two-colour combination wasn’t true to the original window grills. At this point I decided that all these little windows should be silver only. I realised this will mean that I have to re-do the first one, but that’s probably not a bad thing (don’t tell anyone, but it is actually slightly too tall and too thin to meet the 6 x 6 cm anyway).
The next opportunity to get into the studio led to much better results and the knots came together much easier.

I also discovered that my bench block is 6 x 6cm (handy). I haven’t trimmed the edges of the nets yet, but it did get me to thinking about how I was going to frame the windows…. A couple of cardboard edges give more of a sense of what will be included.
